No products in the cart.
Hair Care Guide
How to sew clips on hair extensions in less than 5 minutes?
People often buy hair extensions with clips to add thickness and length, because hair clips quickly and easily attach to your hair. However, some hair extensions with clips available in the market can cost you a lot. So, Is it possible to make your own hair clips? The answer is absolutely yes. You can make your own hair clips at home by sewing clips on hair extensions. If you want to do it, the article below is on how to sew clips on hair extensions that will help you with the most accurate and detailed instructions.
Why you should sew clips on hair extensions

Sewing clips on hair extensions will bring more benefits than you think. Here are the top reasons why you should do this way:
- With just a few simple sewing steps you have a clip in hair extension that gives you the flexibility to modify your style and design.
- Instantly transform your hair from short to long or add thickness, easily changing your style.
- In case the clip is damaged, it is quite easy to remove the sewing part because it is sewn with thread.
- Sewing clips to the hair extensions yourself will also help you save more money on hair extensions instead of having to go to an expensive salon to attach them.
- On the other hand, If you have skillful hands, you sew the clips firmly, your clip in hair extensions can last a very long time.
If you already understand the benefits of this method, then let’s explore the preparation process below before starting.
How to sew clips on hair extensions: Preparations
1. Weft hair extensions
You will need to measure your head and consider the thickness you want for your extensions before deciding how many hair extensions you should buy. Besides, make sure the color and texture of the hair extensions match your natural hair. The color of the extension is as close to your hair color as possible for a nice blend.

2. Sharp scissors
For a clean cut for your horizontal hair extensions
3. The curved needle and the invisible thread
For sewing weft and clips.
4. Measuring tape
To measure the width of each section so you can have a clip that fits your head best.
Note: You can also prepare a sewing machine to sew the wefts together and glue to strengthen the bond between the weft threads and the clamp, but it is optional.
In case you have a sewing machine, you can buy hair in bulk to make weft hair to save costs. However, the process will be a bit complicated and time consuming. Therefore, we recommend using ready-to-use hair extensions.
8 Simple steps How to sew clips on hair extensions
Step 1: Cut a piece of thread twice as long as your forearm.
Grab the threads that are pretty close in color to your hair. Hold the thread next to your forearm and pull out a long stretch. Continue pulling the thread until it is twice as long as your forearm.
Step 2: Thread the thread through the hole in the needle and tie a knot at the end.
Loop the thread over the eye of the needle, then pull it through. Pull both ends of the thread so that they are the same length. To secure the thread in place, knot both ends together. You can use a regular sewing needle for this, or you can use a curved needle designed to join hair and wigs.
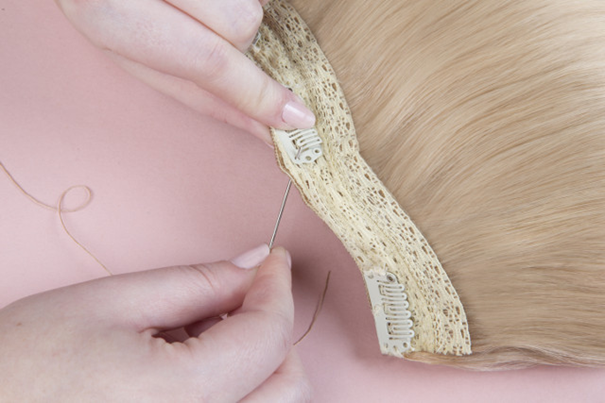
Step 3: Place your wig clip face up along the edge of the weft.
Check that the round part of the clip is facing up so you can easily attach the extension to your natural hair. If your clip is facing the wrong direction and forming a “U” shape, you won’t be able to clip your hair properly. It is best to use wig clips for this, as they are designed to be sewn into the weft.

Step 4: Tie the thread 3 times around the first hole of the wig clip.
Loop the thread through the first wig clip hole, then guide the thread through the loop attached to your needle. Tie the thread to form a knot along the wig clip, helping to keep it in place. Make 2 more knots like this one to secure the clip to the hair.
Step 5:Tie the thread 3 times through the next wig clip hole.
Thread the needle through the next hole in your wig clip, going through both the weft and the clip. Pull your thread through the loop attached to the needle to form a knot, then tighten the knot along the base of the wig clip and extension. Repeat this process 2 more times, thread the needle through the weft and clip, then make a knot with the thread.
Step 6: Repeat the knotting, threading, and knotting process three times until you reach the final hole.
Thread your needle through the weft first, going front to back. Once you’ve done this, loop your yarn through the next wig clip hole and form a knot. Make a total of 3 knots to secure your wig clip in place.
Step 7: Secure one last button below the wig clip
Thread your needle through the front of the weft, pulling it out underneath the wig clip. Pull your needle through the loop thread to create a knot. Remember that this knot will be underneath the wig clip

Step 8:Cut any excess thread from the extension.
Look along the edges of your wig clips and extensions for any loose threads. Cut the threads as close to the edge of the wig extension or clip as possible.
You can now attach your extensions with clips to your hair. You can also style it as you wish with your hair extensions and be very gentle to avoid revealing the clips!
Final thoughts
Hope this article on how to sew clips on hair extensions has helped you with the necessary information. This is one of the cheapest and easiest ways to make your own hair clips at home. You only have to spend a little money to buy ingredients and a little time. This way of attaching clips by sewing is very firm, you can completely create any style you like.
If you want more tips to care and style hair extensions at home. You can refer to Jenhair’s information and don’t forget to check our blog to update the latest articles.
Related posts:

 Guide Cornrows With Side Part The Best For Beginner
 Ultimate Guide: Headband with Hair Attached (Best Styles for 2025)
 Top 7 Premium Human Hair Clip In Extensions For Black Hair
