No products in the cart.
Hair Care Guide
How to put on a wig? A step-by-step guide to applying a wig for beginners
Wearing a wig is a great way for you to try various haircuts, styles, and colors without damaging your natural hair. However, do you know how to put on a wig in the right way? Do you find it difficult to apply a wig for the first time?
This article is a step-by-step and straightforward guide for a newbie who desires to learn how to put on a wig. After absorbing this, you will have all the information required to apply a wig with confidence even for the first time.
Want to discover?
Let’s jump in right now!
How to put on a wig?
Depending on each type of wig, you must apply different ways to put on a wig. However, to save your time, we will show you steps to put on a wig easily for newbies. Check out these suggestions for applying a wig to keep your wig looking flawless
Before putting on a wig, what you need are a wig cap that matches your skin tone, wig glue, hair gel, makeup powder, special combs, and bleach powder.
Now, let’s dive deeper into how to put on a wig for beginners!
Step 1: Prepare your hair
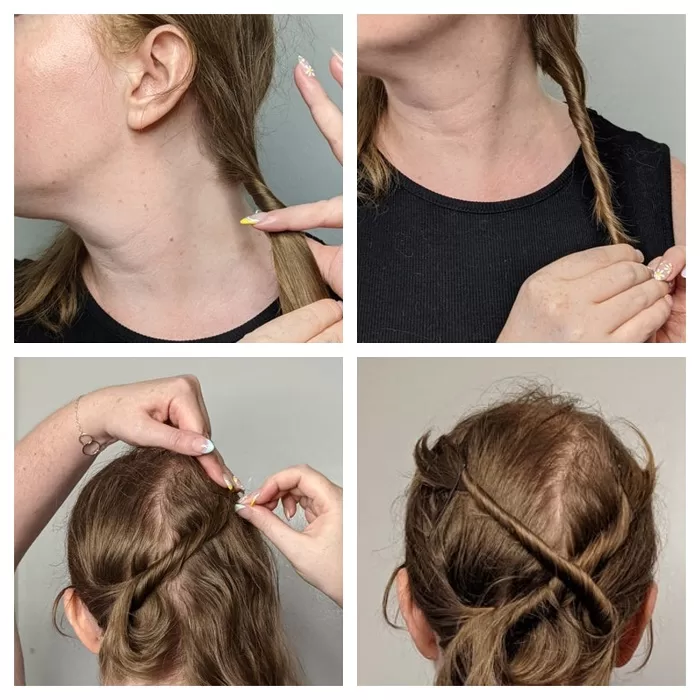
Whenever you put on your wig, you must fix your hair so that it does not create any bumps or uneven areas. No matter if you have long or short hair, you must make sure that all of it is pulled back from your hairline so that the wig won’t be visible.
For example, if you own long and thick hair, you can separate them into 2 pieces, twist them and attach them with pins. In contrast, Shorter hair is easily removed from the hairline by combing it and pinning it back. As much as possible, try to flatten your hair against your head.

Step 2: Prepare your skin
This is an additional vital step to assist your lace front portion looks real when you’re wearing a wig. This step helps adjust the cap to make the parts look like your scalp if you select a wig cap that isn’t the same color as your skin.
Step 3: Put on a wig cap
Stretch the wig cap back over your head while holding the wig cap’s front against the front of your hairline. Next, brush your hair under the hat from front to back. Please make sure that the wig cap is at your natural hairline.
Using powder or concealer to the wig cap will help if the color of the cap doesn’t match your skin tone. Make sure your skin tone is reflected in your makeup.
Step 4: Place the wig on your head
You can now put on a wig after placing your wig cap.
Place the front edge of your wig base next to the front edge of your wig cap at the neck area of your head. Apply your wig delicately from front to back. Then, put on the wig like a bathing cap, placing it above your eyebrows.
You need to be very delicate when putting on the wig on your head. Make sure the item sits directly at your natural hairline and that the lace is not tucked beneath by positioning the ear tabs on both sides in front of your ears.

Step 5: Secure the wig
You can use wig glue to keep your wig in place and to make your hairline look more realistic. Put a little amount of adhesive glue on the wig’s hairline as well as the natural hairline that is visible below the wig.
For further security, you can also use items like wig tape or wig clips. Check to see if the bobby pins are hidden while attaching the wig foundation to the wig cap.
You can add the extra powder to the areas around your hairline and part to make your wig look even more natural. This will further conceal the hairline of your wig.
Tips to wear a wig
Here are some tips for you to wear a wig easily. Hope that they can help you minimize your challenges the first time you put on a wig.

- The size of your wig must be accurate. You may find it challenging to put on a wig in the first time if it is too big or too small.
- Don’t forget to customize the fit of the wig by adjusting the tabs inside.
- Consider getting one of your wigs cut in a shorter hairstyle when your hair grows back to help you transition from wearing wigs to not wearing them at all.
- Check out more tips related to each type of wig when it comes to wearing it.
- Use the ear tabs on your wig: Wigs come with ear tabs that serve as positioning indicators. Your wig is most likely in the proper position if the tabs are in the same location on both sides of your face.
- Adding conceal to your part of the hairline will guarantee that the wig material coming with your scalp exactly complements the color of your skin.
FAQ
1. How do I know my wig size?
You should not worry about this because many wigs are available in small, medium, and large sizes. If you are not sure about your wig size and how to measure your head size, you can contact the sellers to help you
2. After wearing it, can I wash my wig by using a shower?
We do not advise doing this. It could put too much pressure on the hair and cause intractable tangles. You also need to contact professionals to acquire more needed knowledge related to this problem.
3. What are the different types of wig attachments?
There are many different wig types, and there are numerous ways to attach wigs and keep the hair in place, including tapes, pins, clips, wraps, and combs. The decision is ultimately up to the person. Moreover, it is also influenced by their circumstances and preferences.

Final thoughts
In this article, a complete guide with all the tips and tricks for how to put on and wear a wig has been shown to you clearly. If you are a newbie, you should bear in mind to be patient and take your time when preparing and applying wigs. This will help you to prevent wig damage and get the most realistic appearance.
Love what we share?
Why don’t you subscribe to us and keep our blogs updated? You will receive notifications when we have brand-new content.

 Guide Cornrows With Side Part The Best For Beginner
 Ultimate Guide: Headband with Hair Attached (Best Styles for 2025)
 Top 7 Premium Human Hair Clip In Extensions For Black Hair
