No products in the cart.
Hair Care Guide
Which is better: Dutch braids vs French braids?
Not sure which braid to choose, Dutch braids vs French braids? In our in-depth pieces, we cover both styles and offer detailed instructions and tips.

Ever found yourself unable to choose between dutch braids vs french braids? Everyone has this occasionally; but, don’t worry; we are here to assist. Though at first glance French and Dutch braids seem somewhat similar, in truth each has special qualities. We will outline the key differences between French and Dutch braids so you may choose with more simplicity.
In what ways do Dutch and French braids differ?
The construction of a Dutch braid and a French braid distinguishes them most importantly. Unlike French braids, Dutch braids cross the strands under to provide a raised appearance that distinguishes the hairdo.
French Braids
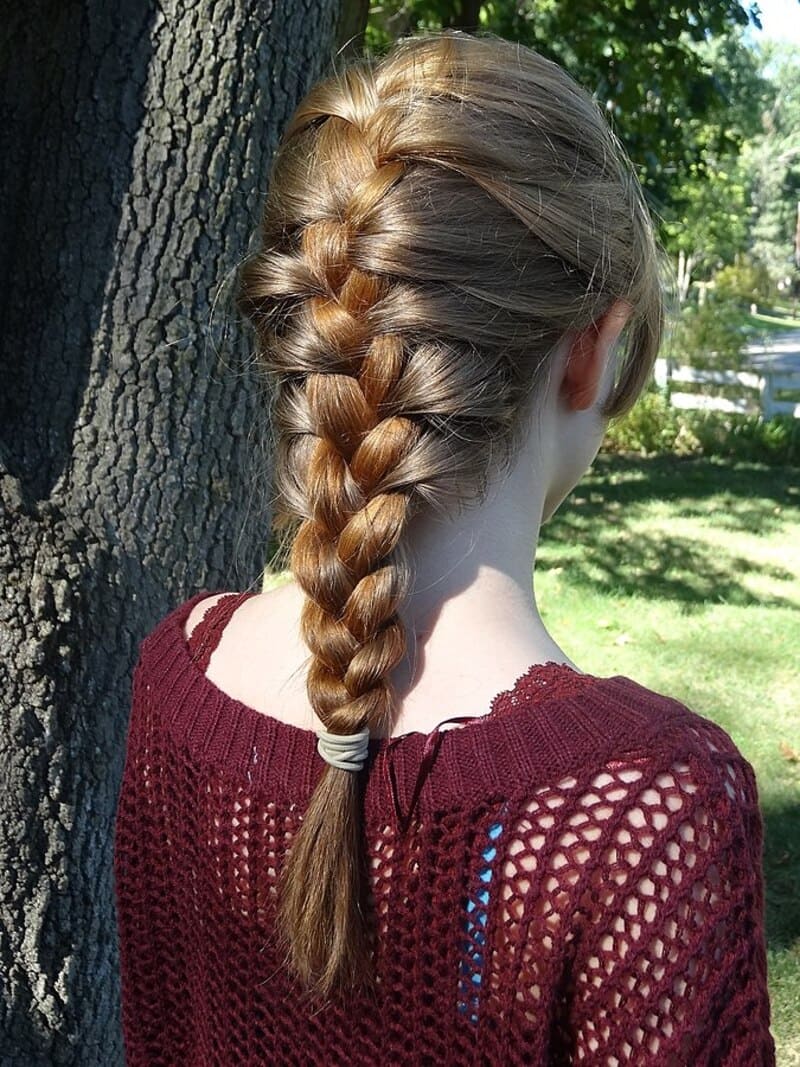
One of the most often used braided hairstyles available nowadays is the French braid. It threads three sections of hair from the crown of the head to the nape of the neck extremely precisely. It was first written about in the short story “Our New Congressman” by March Westland in an 1871 issue of Arthur’s Home Magazine. The story described it as a new haircut. Even though this is an old reference, it’s still not clear how it fits in with the modern French braid method.
These days, the French braid is more useful than a simple braid. It can be done without help, though the level of difficulty depends on the type and length of hair. It can hold multiple hair parts for flexible styling.
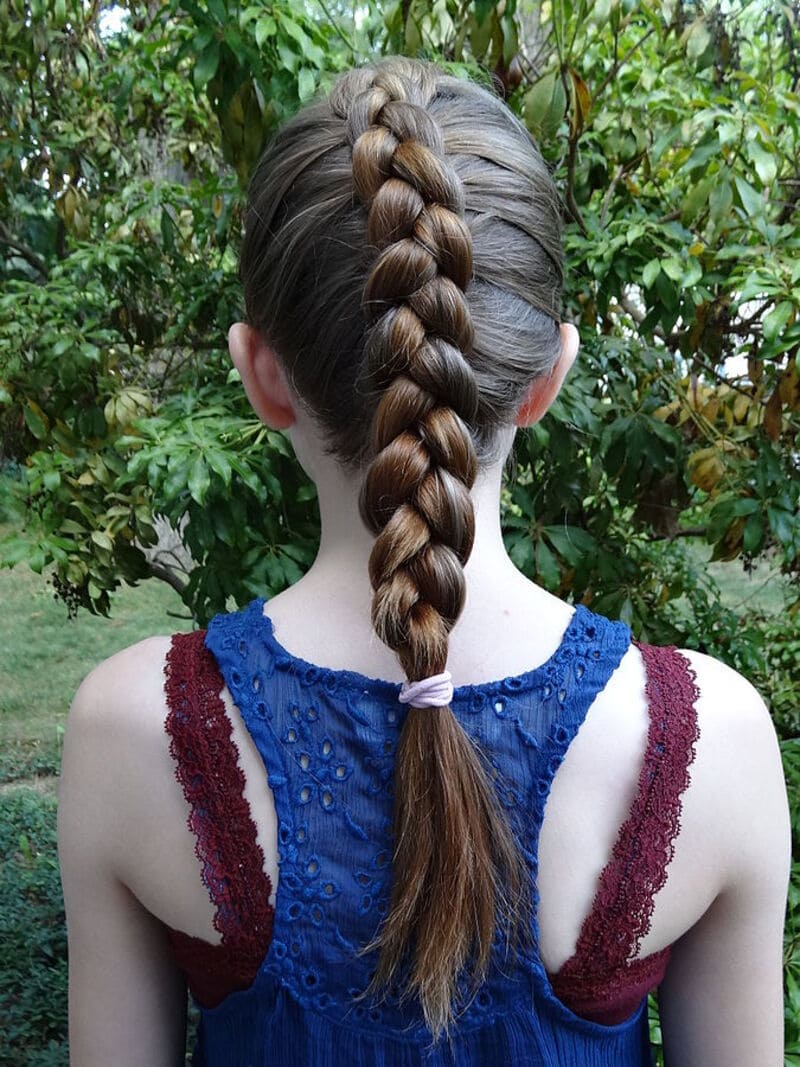
With the Dutch braid, sometimes known as the “reverse French braid,” the threads are crossed beneath rather than over. Though it looks difficult, it’s really rather simple to do!
A simple Dutch braid can be done with hair of any length. But if your hair is short, you could try a double Dutch braid. In this style, you tie two knots on either side of your head.
The hair is basically split into three sections. From the top of the head to the base of the neck, the outer sections are crossed under the middle section. The Dutch braid sits on top of the hair and tucks the strands neatly under, making it look higher. The French braid has a flowy style. Like the French braid, you can wear it as either a single braid or a double braid. Some people call double Dutch braids “boxer braids.”
How to Make a Classic French Braid
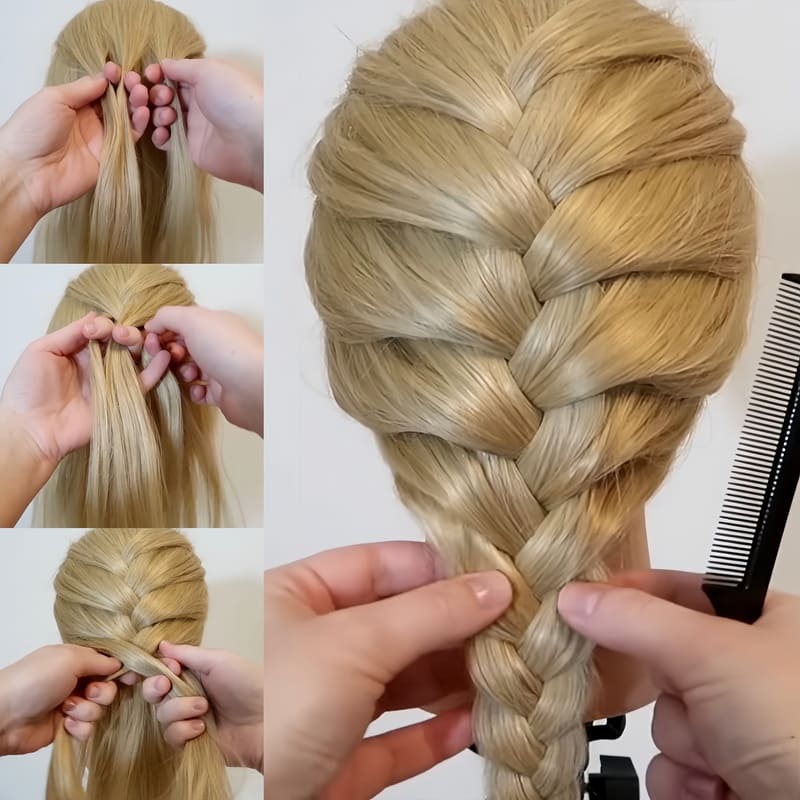
Prepare Your Hair
Begin by preparing your hair for styling. Use a brush to remove any tangles and ensure your hair is soft and smooth. Depending on your desired look, brush your hair away from your forehead for a single braid down the back, or divide your hair into sections for multiple braids.
Section Your Hair
Gather a chunk of hair, approximately 3-4 inches wide, from the top-center of your head. It’s essential that all the hair in this section comes from the same “hair row.” If you have bangs, decide whether to include them in the braid or leave them loose.
Divide Your Hair
Separate the gathered section into three equal pieces to create the foundation for your braid. Ensure each strand is evenly sized to maintain consistency throughout the braid.
Start Braiding
Initiate the braiding process by crossing the right strand over to the center, followed by the left strand. Repeat this pattern to create a few rows of a traditional braid, establishing the base for your French braid.
Work in New Hair
Continue braiding in the traditional pattern, but begin incorporating additional sections of hair as you progress. Before crossing each section over to the center, gather new hair from the corresponding side of your head and include it in the braid. Repeat this step to add volume and intricacy to your French braid.
Incorporate All Your Hair
Add fresh hair parts as you braid down your head until the braid includes all of your hair. Make sure the braid stays neat and tight as you work down.
Finish the Braid
Once all of your hair is included into the braid, keep braiding in the conventional manner until your strands run to their finish. Using a ponytail holder can help you secure the braid and avoid rubber bands that cause hair damage.
Watch a step-by-step tutorial on how to French braid through this video to master the technique effortlessly.
By following these instructions, you’ll craft stunning French braids, enhancing your hairstyle options for any event or occasion.
How to Make a Simple Dutch Braid
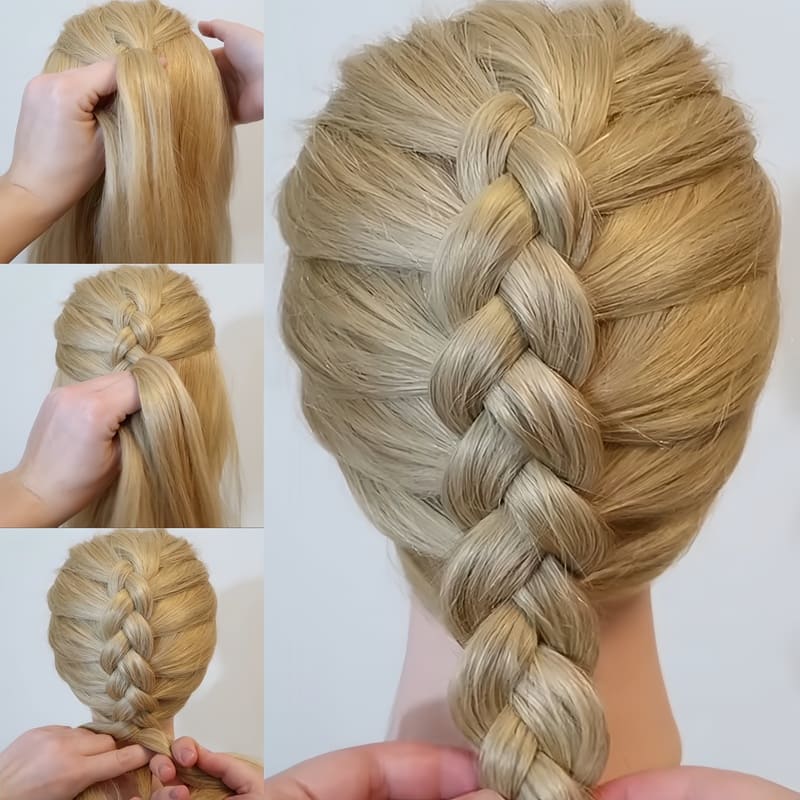
Prepare Your Hair
Whether your hair is dry or somewhat moist, start with well brushed hair. Run a brush through your hair to be sure it is knot- or tangles-free. Lightly spray any stray hairs or flyaways with water or a smoothing agent like pomade.
Section Your Hair
Straight back brushing your hair helps you avoid side or center sections. From your front hairline, grab a chunk of hair using your thumbs over the width of your forehead. Alternatively, you may arrange your hair in a half-up, half-down ponytail at eyebrow or eye level.
Divide Your Hair
Three equal strands should be formed from the gathered hair portion. With your right hand hold the right strand; with your left hand hold the other two. Let the middle strand drape over your middle finger; hold the left strand on your palm with your pinkie.
Start Braiding
Initiate a standard braid to anchor the Dutch braid. Cross the right strand under the middle one, followed by crossing the left strand under the new middle strand. Ensure you cross these strands under instead of over, as in a standard braid. This step is crucial for the Dutch braid to turn out correctly.
Add Hair Sections
Before crossing the right strand under the middle one, add a thin section of hair from the right side of your hairline to the right strand. Treat the two strands as one and cross them under the middle strand. Smooth down any stray hairs to maintain a tight braid. Repeat the process on the left side by adding a thin hair section from the left side of your hairline to the left strand and crossing it under the middle one.
Continue Braiding
Repeat the Dutch braiding process, adding thin hair sections from each side as you braid down towards the nape of your neck. Keep the thin sections consistent in size and maintain a tight braid, adjusting the tightness as needed. Stop braiding when you reach the nape of your neck.
Finish with a Standard Braid
Once you’ve reached the desired length, gather the remaining hair into three equal strands—right, middle, and left. Braid the strands together in a standard braid by crossing the right and left strands under the middle one. Ensure your stitches are tight and smooth, then tie off the braid when you have about 2 inches (5.1 cm) left. Optionally, you can continue braiding down to the very end.
Customize Your Braid
To look better, gently tug on the braid’s outer strands from the end upward. For a laid-back appearance, you can also muss the fine hairs at your hairline. Coil the braid into a bun at your nape of the neck and fasten it with bobby pins to add a romantic touch.
See this video for a detailed step-by-step guide on Dutch braid technique to quickly become proficient.
These guidelines will help you to design a beautiful Dutch braid that accentuates your variety of hairstyles. Whether it’s a formal function or a laid-back stroll, the Dutch braid provides beauty and adaptability for any setting.
FAQs:
Which one last longer – French braid or Dutch braid?
Dutch braids are supposed to stay longer than French braids since they better hold the hair in place for extended periods. This tighter hold is fantastic as hair moves about while you exercise or play sports and helps to keep it in place better. Because Dutch braids preserve their form better over time than French braids, they last more than French braids as a haircut. The type of hair, the tools used, and the dexterity of the braider—all of which affect the lifetime of a braid style.
Which braids, French or Dutch, make better waves?
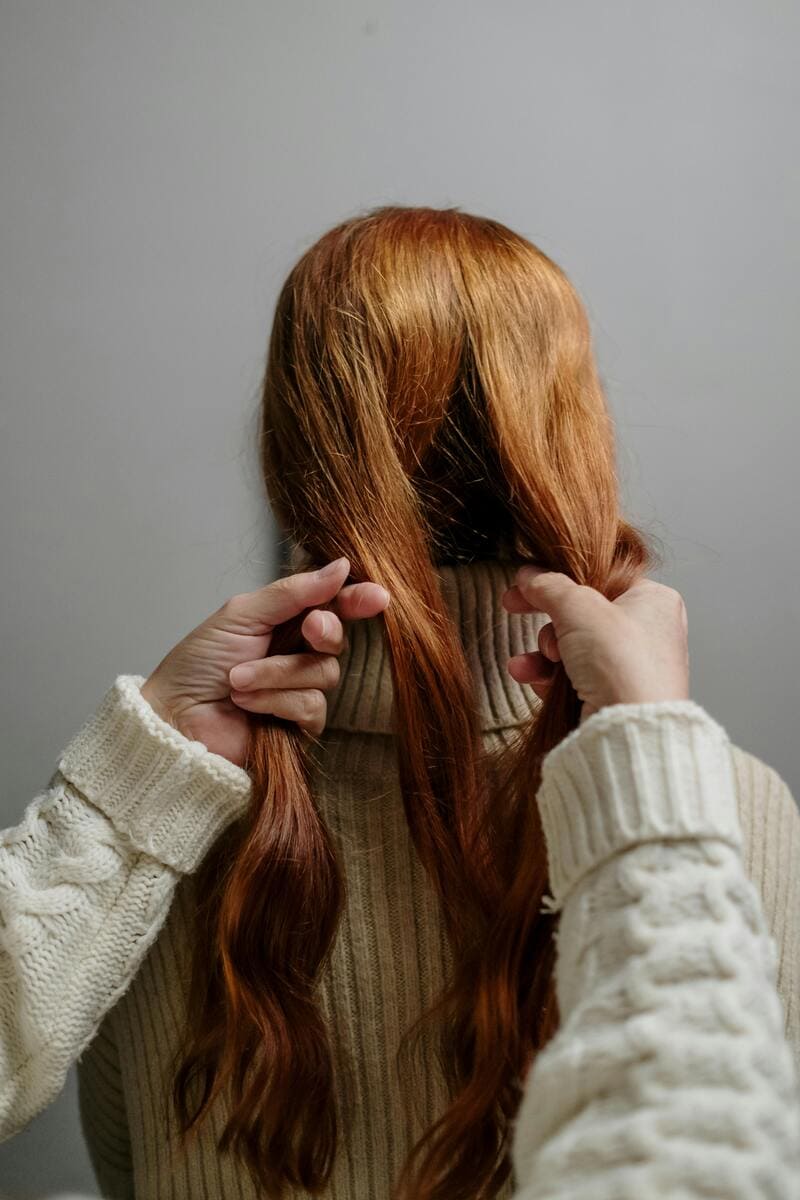
After you remove them, both French and Dutch braids will leave your hair with wave. Conversely, Dutch braids often create waves that are more noticeable. This is so because the underhand weaving technique drives more hair up and away from the scalp, therefore producing a wave pattern with deeper and more textured outcome.
Are French Braids Easier To Do Than Dutch Braids?
Most people believe that learning and getting competent at French braids is simpler than that of Dutch braids. This is so because overhand twisting action of French knots seems more natural and simple. A bit more expertise and practice can help you to obtain a smooth and even weave with the underhand technique in Dutch braids.
Final Thoughts
One last thing: I think both French and Dutch braids look great. French braids protect your hair from heat damage and give you waves that look natural and easy. On the other hand, Dutch braids don’t do this. A little more volume and bounce gives them that nice raised look. If you can get good at both, you will be able to change how you look depending on the situation or state of mind.
So why not check them both out and choose the one that fits your style better? Get in touch with Jen Hair Studio or go there today to see the magic for yourself, whether you want French braids or Dutch braids.
Recommendations:

 Guide Cornrows With Side Part The Best For Beginner
 Ultimate Guide: Headband with Hair Attached (Best Styles for 2025)
 Top 7 Premium Human Hair Clip In Extensions For Black Hair
