No products in the cart.
Hair Care Guide
How to Do a Fishbone Plait: 5 Stylish Variations
Master the art of fishtail braiding with Jen Hair’s detailed guide on how to do a fishbone plait. Follow our step-by-step guide on how to do a fishbone plait!
Intro
Say goodbye to mundane braids and welcome the charm of the fishbone plait, aka the fishtail braid! This versatile hairstyle isn’t your typical plait; it’s a showstopper that effortlessly enhances any look, whether it’s casually chic or elegantly bohemian.
Worried about its seemingly intricate nature? Fear not! Our comprehensive guide on how to do a fishbone plait is here to simplify the process, catering to both braiding beginners and seasoned stylists. We’ll break down each step, turning the fishbone braid into an achievable masterpiece.

What Is A Fishbone Braid (Fishbone Plait)?
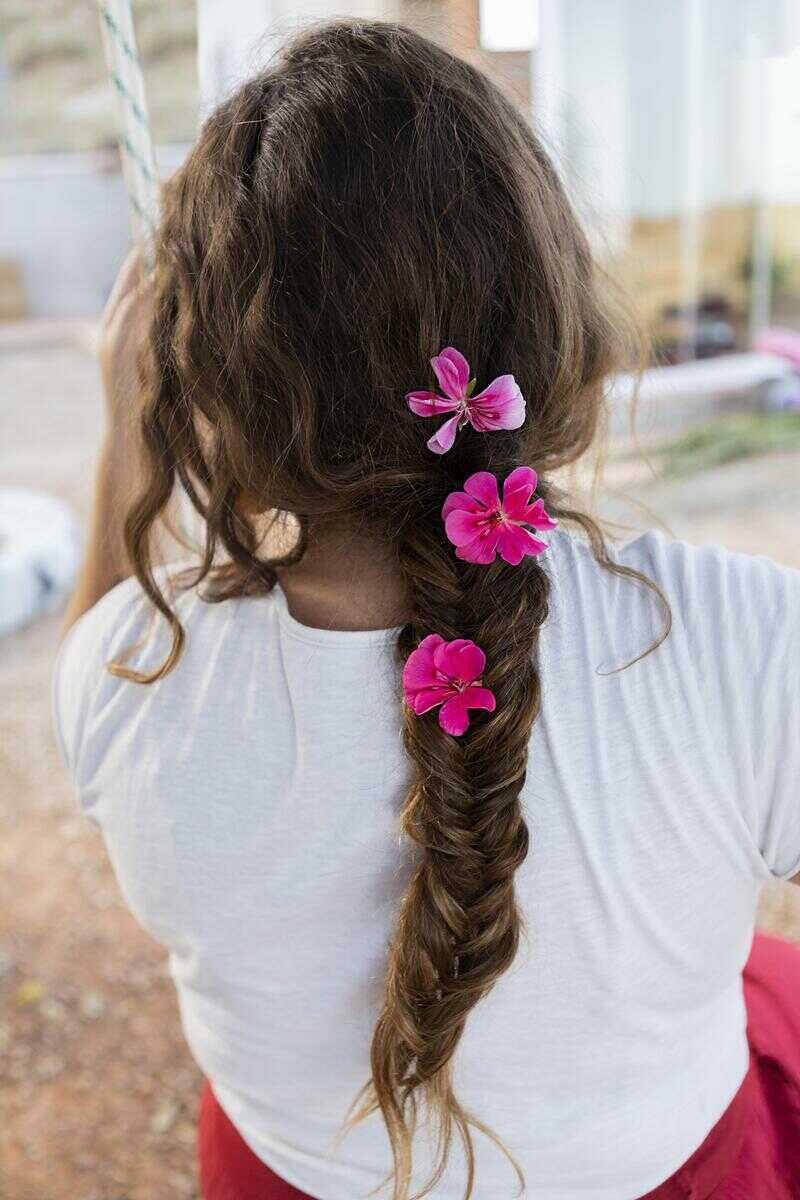
Fishbone braids, also known as fishtail braids, are not just a trend; they’re a versatile and practical choice for anyone looking to spice up their hairstyle.
Here’s a breakdown of why they’re a go-to option:
- Suitable for thin, thick, straight, or curly hair, fishbone braids adapt seamlessly to diverse textures and lengths.
- From classic single braids to intricate updos, fishtail braids effortlessly enhance any look. They transition easily from casual to glamorous with the addition of accessories.
- Low maintenance and shape-retaining, fishtail braids are perfect for busy schedules. They provide a chic look without the need for constant touch-ups.
- Fishtail braids offer a heat-free styling alternative, ensuring your hair stays healthy while looking effortlessly chic.
- For those with curly or coily hair, fishbone braids act as a protective style, managing frizz and minimizing damage from daily brushing.
- The unique chevron pattern adds visual interest, making fishtail braids stand out. Universally flattering, they elongate the face and add definition to your features.
- Personalize your fishtail braid with accessories, colorful extensions, or experiment with different weaving techniques to create a look that’s uniquely yours.
How to Do a Fishbone Plait Step By Step
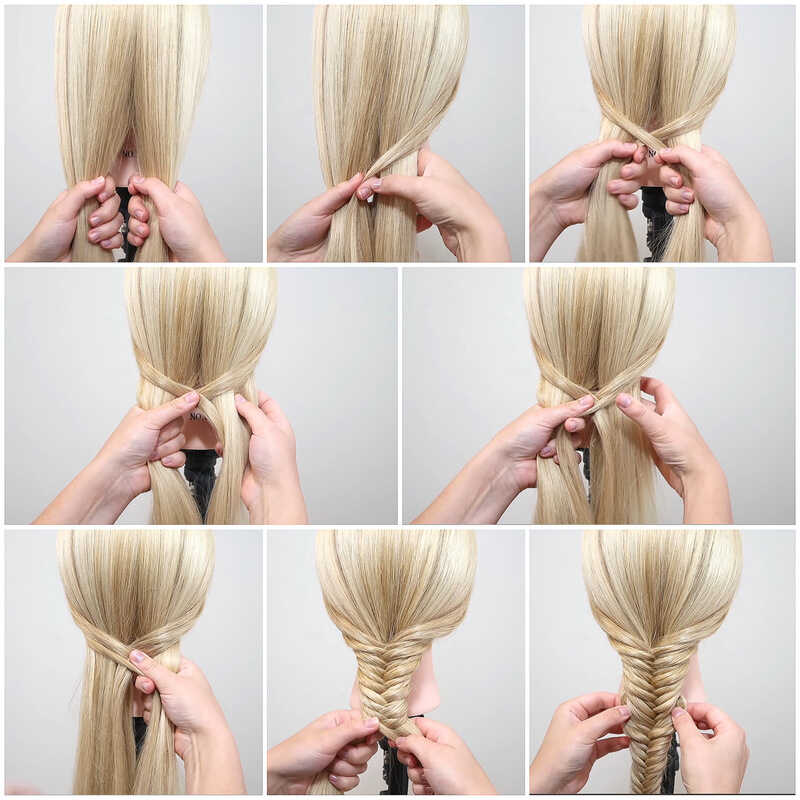
How to Do a Fishbone Plait:
Step 1: Divide Your Hair
Begin by dividing your hair into two equal sections – a left piece and a right piece.
Step 2: Take a Thin Strand (Left)
Select a thin strand from the left section, gathering it from the outside. Ensure it is no thicker than 0.5 inches (1.3 cm).
Step 3: Pull and Tuck (Left to Right)
Pull the thin strand up and across the left section, moving it towards the right. Tuck it under the right section, incorporating it into the right side.
Step 4: Gently Tighten the Sections
Gently tug on both sections to tighten the braid. Move your hands upward for a secure hold. A tighter braid allows for a neater appearance, and you can tousle it later for a more casual look.
Step 5: Take a Thin Strand (Right)
Extract a thin strand from the right section, gathering it from the outside. Maintain its thickness at no more than 0.5 inches (1.3 cm).
Step 6: Pull and Tuck (Right to Left)
Pull the thin strand up and across the right section, moving it towards the left. Tuck it under the left section, integrating it into the left side.
Step 7: Alternate Sides
Continue alternating sides, repeating the process until you reach the end of your hair. Leave at least 1 inch (2.5 cm) unbraided to facilitate tying it off.
Step 8: Secure with a Hair Tie
Secure your hair by fastening a hair tie around the tips. Optionally, take a strand of hair and wrap it around the tie, securing it with a 10 bobby pin for a polished finish.
Step 9: Create a Tousled Effect
If desired, create a tousled effect by rubbing the braid between your hands. Note: Skip this step if your hair has many layers, as it may naturally tousle on its own.
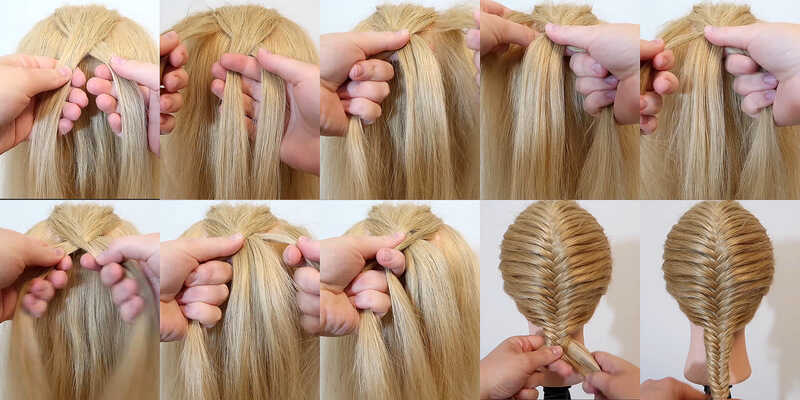
B. How To Do A Fishtail French Braid
Step 1: Start by taking a small section of hair from the top of your head and divide it into two equal sections.
Step 2: Cross the right strand over the left and shift the strands to your right hand. Pick up a new section of hair on the left side and add it to the right strand.
Step 3: Move the strands to your left hand, using your thumb and index finger to lock the hair in place. Pinch the strands where they cross.
Step 4: Pick up a new section of hair on the right side, cross it over, and add it to the left strand. Shift the strand to your right hand and lock the hair in place.
Step 5: Repeat these steps, alternating sides. Always pick up a small section from the strand before crossing it over.
Step 6: Continue until there is no more hair to add in. Then, transition into a basic fishtail braid. Take a small section from the right strand, cross it over, and add it to the left. Mirror the steps on the opposite side.
Step 7: When you reach the end, secure the braid with an elastic.
P/S: For step-by-step instructions, watch the dedicated video tutorial.
C. How To Do A a Faux Fishtail Braid
Step 1: Gather Supplies
Find thin hair elastics matching your hair color. Clear ones work too. Ensure an adequate supply for multiple topsy-turvy ponytails.
Step 2: Choose Appropriate Hair Length
This style suits longer hair and may not be as effective on hair shorter than the upper arm.
Step 3: Pull Hair into Low Ponytail
Gather your hair into a low ponytail, keeping it as close to the base of your head as possible. Avoid making it overly tight.
Step 4: Craft a Topsy-Turvy Ponytail
- Insert your pointer and middle fingers above the elastic.
- Separate your fingers, forming a hole.
- Pull the ponytail over the elastic and through the hole.
- Gently tug and smooth down your hair.
Step 5: Tie Another Elastic Lower Down
Tie another elastic a few inches down from the first. Adjust placement based on hair thickness—closer for thin hair, slightly further for thick hair.
Step 6: Repeat Topsy-Turvy Ponytails
Create a second topsy-turvy ponytail.
- Slip fingers above the elastic, forming a hole.
- Thread the tail downwards, pulling it through the hole.
Proceed until you are left with a few inches of hair.
Step 7: Finalize with a Hair Tie
Secure the remaining hair by fastening it with a hair tie.
Step 8: Consider Hiding Elastics
Optionally, hide elastics by:
- Gently tugging strands to add volume.
- Wrap colored ribbon or string around elastics.
- Enhance with colorful beads for a boho or festival-inspired look.
P/S: For step-by-step instructions, watch the dedicated video tutorial.

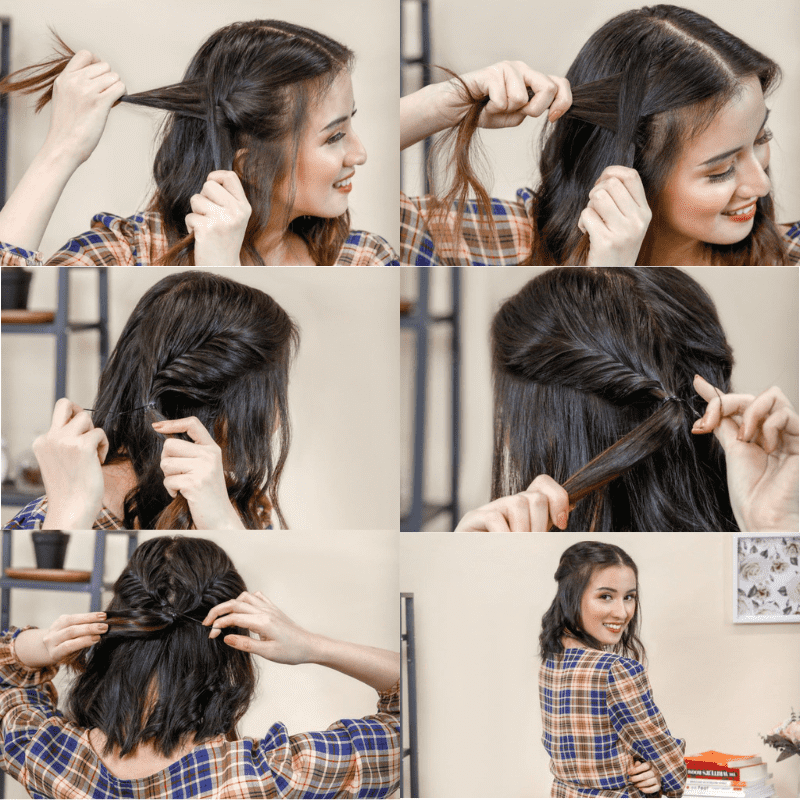
D. How To Do a Half Up Fishtail Braid for Short Hair
Step 1: Start Braiding
- Take a section from the right side and divide it into two.
- Cross a small section from underneath one part over to the middle.
- Repeat the process with a section from the other part, creating the distinctive fishtail pattern.
Step 2: Keep Braiding
Continue crossing sections, allowing the fishtail braid to take shape. The gradual incorporation of hair enhances the intricate design.
Step 3: Secure Your Braid
Braid until you reach the crown, securing it in place with an elastic. Make sure to secure the hair tie tightly for a refined and polished look.
Step 4: Repeat on the Other Side
Mirror the process on the opposite side, creating a symmetrical look. Follow the same steps to craft a fishtail braid.
Step 5: Tie Both Braids
Once both braids are complete, bring them together at the crown. Secure them with another elastic to unify the style.
Step 6: Finalize Your Half Updo
Showcase your beautiful half up fishtail braid for short hair confidently. This versatile hairstyle suits various occasions, allowing you to flaunt your style at work or on weekends.
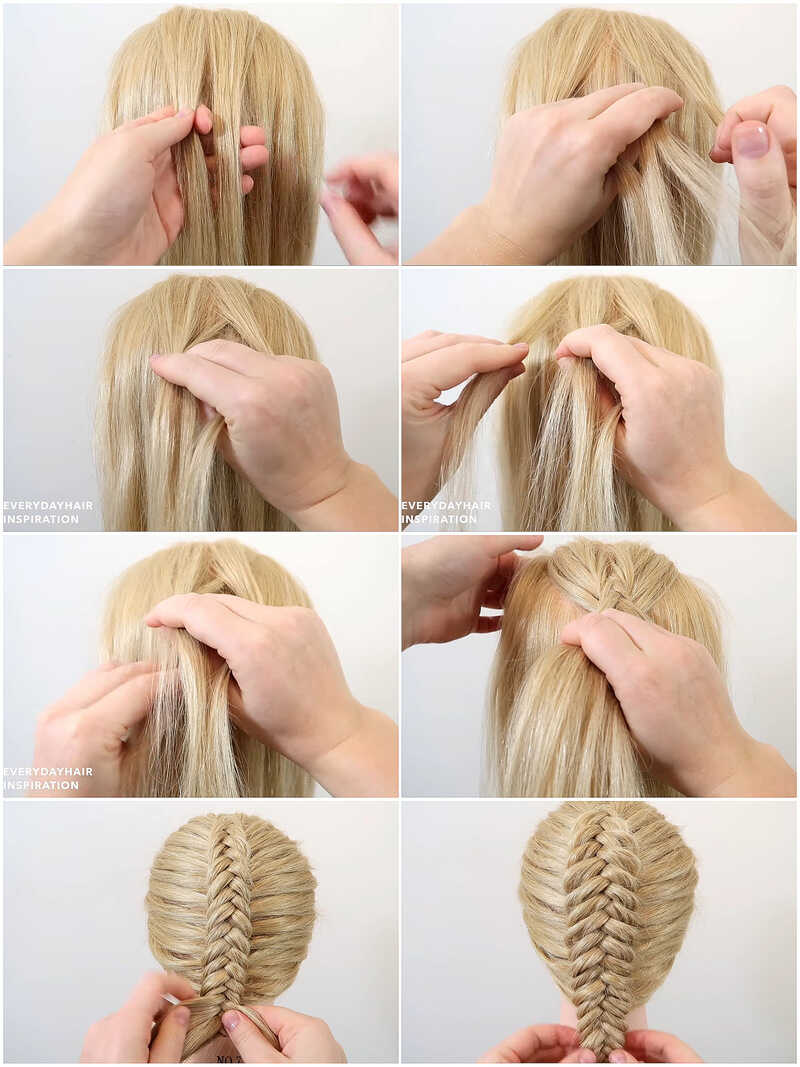
E. How to Do a Fishbone Plait (Dutch-Style)
Step 1: Prep Your Hair
Begin with day-old hair for optimal results. Create a side parting, even if it’s not your usual style. If your hair is fine, consider applying volumizing texture dust at the roots for added volume and grip.
Step 2: Section the Hair
Take a small section of hair at the front (about an inch wide and two inches long) to initiate the braid. If your hair is not naturally thick and long, consider using extensions for a fuller look.
Step 3: Start the Dutch Fishtail
Separate the front section into two strands. Begin with a regular fishtail braid by crossing small sections from one side under and passing them to the other side. Repeat this process, gradually incorporating additional hair from the head as you move down.
Step 4: Incorporate Hair
As you progress, pick up small sections from each side of the head while incorporating them into the braid. Maintain clean sections for a polished look.
Step 5: Continue Braiding
Repeat the process, holding the strands tight to avoid loosening. Ensure smooth and tangle-free sections, especially if your hair tends to tangle easily.
Step 6: Transition to the Other Side
Once you reach the side of your forehead, start incorporating hair from the other side. Continue the braiding process, ensuring a seamless transition.
Step 7: Pull Apart the Braid
Periodically pull apart the braid as you go to achieve a loose and textured appearance. Gently tug on the outer half of each loop for a well-balanced result.
Step 8: Complete the Braid
Incorporate all the hair from the back of your neck, transitioning into a regular fishtail braid as you reach the ends. Continue fishtail braiding until you prefer, then tie it off with a small elastic band.
Step 9: Final Touches
Encircle a slender section of hair around the elastic to hide it from view. Pull out tiny strands on both sides of your head for a soft and messy finish.
P/S: For step-by-step instructions, watch the dedicated video tutorial.
FAQs
Can I fishtail braid thin hair?
Absolutely! Fishtail braids work well on thin hair. To enhance grip, consider using a texturizing spray or applying some volumizing product at the roots before braiding.
How do I prevent my fishbone plait from falling out?
You should ensure a secure hold by starting with well-brushed and detangled hair. Tighten the braid as you go and use small, clear elastics to secure the ends. A light hairspray can also help set the style.
Does a fishtail braid give a wavy hair effect?
Yes, a fishtail braid can contribute to a natural wave effect, especially when you braid damp hair and let it air-dry. For more defined waves, you can unravel the braid once it’s dry.
Why does my fishtail braid turn into a regular braid when following instructions?
The most common reason for this is not consistently taking small sections of hair from the outer edges. Ensure you’re consistently adding hair to each side before crossing them over to maintain the fishtail pattern.
Final Thoughts:
This versatile hairstyle allows endless expression of your unique style. Whether you’re a braiding novice or a seasoned pro, this comprehensive guide on how to do a fishbone plait has equipped you with the knowledge and skills to craft stunning fishtail variations that are sure to turn heads.
So, grab your comb, some elastics, and a touch of creativity, and dive into the art of fishtail braiding! However, let’s admit it – sometimes, even the most skilled home braider desires the magic touch of a professional. Enter Jen Hair salon! Our team of expert stylists is passionate about all things hair, especially creative braiding.
Recommendations:

 Guide Cornrows With Side Part The Best For Beginner
 Ultimate Guide: Headband with Hair Attached (Best Styles for 2025)
 Top 7 Premium Human Hair Clip In Extensions For Black Hair
